Demo: Jupyter Notebook#
This is a sample Jupyter Notebook that you can download and run. The goal is for you to become confortibels with running an interactive Jupyter Notebook in Jupyter Lab.
Video by JSTOR on this Notebook: Getting Started with Jupyter Notebooks
Introduction#
Welcome to your first Jupyter notebook. Jupyter notebooks are documents that contain both computer code (like Python alongside explanatory images, figures, videos, and links. Most importantly, the code in a Jupyter notebook can be executed, modified, and deleted. As you explore this notebook, please feel free to modify the text, the code, and to generally play around with the environment. You can always redownload this notebook to get it in its original configuration. Later, you may learn how to create, modify, and save your own notebooks to share with others.
Cells#
Similar to the way an essay is composed of paragraphs, Jupyter notebooks are composed of cells. A cell]is like a container for a particular kind of content. There are essentially two kinds of content in Jupyter notebooks:
Markdown Cells- These can contain text, images, video, and other kinds of explanatory content you might find on a regular website. This cell is a markdown cell.
Code Cells- These can contain code written in a variety of languages.
A code cellcan be distinguished from a markdown cell by the fact that it contains a pair of brackets with a colon to its left, like so [ ]:
# This is a code cell
A markdown cell provides information, but a code cell can be executed to perform an action. The code cellabove does not contain any executable content, only a text comment. We can tell the text in the code cell is a comment because it is prefixed by a #. In Python, any time a line is prefaced by a # that line is a comment and will not be executed if the code is run. In a code cell, comments are also blueish-green in color.
Hello World: Your First Code#
It is traditional in programming education to begin with a program that prints Hello World. In Python, this is a simple task. We will use the print() function. This function simply prints out whatever is inside the parentheses (). We will pass the quotation “Hello World” to the print function like so:
print("Hello World")
Write this code into the following code cell below. To execute our code, we have a couple options:
Option One#
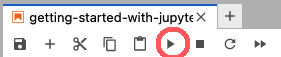 Click the code cell you wish to run and then push the “Run” button above.
Option Two#
Click the code cell you wish to run and press Ctrl + Enter (Windows) or shift + return (OS X) on your keyboard.
Type print("Hello World") into the box below and then run the cell.
Try this!#
Does it matter if you use single or double quotes?
Can you also insert a comment into the code cell?
Can you write code and a comment on a single line? Which must come first?
After your code runs, you’ll receive any output and a number will appear in the pair of brackets [ ]: to the left of the code cell to show the order the cell was run. If your code is complicated or takes some time to execute, an asterisk * will be displayed in the pair of brackets [*]: while the code executes.
Execute the code cell below which:
Prints “Waiting 5 seconds…”
Waits 5 seconds
Prints “Done”
As the program is running, watch the pair of brackets and you will see the code is running [*]:.
print('Waiting 5 seconds...')
import time
time.sleep(5)
print('Done')
Waiting 5 seconds...
Done
If you missed the asterisk, you can run the code cell as many times as you like. Notice that each time you run a code cell the number increases in the pair of brackets [ ]:. This keeps track of the order cells were run. While we will always run code in order from top to bottom, keep in mind that code cells can be run in any order. If you run a code cell at the bottom of a notebook that depends on the output of a code cell at the top, you will probably get an error. When you get an error, it’s a good idea to check if you missed a code cell earlier that needed to be run first.
Creating a Cell#
By default, a code cellis created. To change the cell type, click on the dropdown menu.
Deleting a Cell#
To delete a cell, select the cell (or set of cells) and select “Delete Cells” from the “Edit” menu. (Alternatively, press the key “d” twice.)To delete a cell, select the cell] (or set of cells) and select “Delete Cells” from the “Edit” menu. (Alternatively, press the key “d” twice.)
Modifying a Cell#
The text in code cells can be quickly changed like a regular textbox. In order to change the content of a markdown cell, you need to expose the markdown content underneath by double-clicking the cell. This will reveal the plain text of the markdown that creates various elements like headings, links, images, etc. When you want the cell to render again, you can simply run it again by pushing the play button or pressing Ctrl + Enter (Windows) or shift + return (OS X) on your keyboard.
What is Markdown?#
If you are familiar with HTML, markdown is a simplified way to write HTML elements. Basically it allows you to mark out where headings, italics, bold, and other kinds of basic formatting go. In terms of styling, markdown is very minimalist. If you would like to include an element that is not included in markdown in your notebook, you can also use HTML and CSS in your markdown cells.
How do I write my own Markdown?#
Here are some basic examples to get you started. Double-click on this cell to see how each was made. There are many markdown cheatsheets available on the web.
Headers#
Markdown Syntax |
Rendered Result |
|---|---|
|
Largest header size |
|
Second largest header |
|
Third largest header |
Emphasis#
Use asterisks around texts to add emphasis, also known as italics You can also use underscores ~~A strike-thru effect is created with two tildes~~ ~~
Lists#
A list of ordered items:
List item 1
List item 2
Unordered items:
List item
Also a list item
A list item
Another list item
Also an item
The last item
Links#
This is a link to Research & Scholarly Initiatives Digital Scholarship page.
Images#

Horizontal Rule#
Create a horizontal rule with three hyphens, asterisks, or underscores.
Attribution

Created by Nathan Kelber and Ted Lawless for JSTOR Labs under Creative Commons CC BY License